Round Spoons
Day One
I went from a log to 43 bandsawn blanks. It was a good day! I really didn’t think I would get this far on day one. Mind you, the roughing out is always the easiest part. You can really throw a lot of brute force at the wood without worrying too much about screwing things up.

After splitting my round I did some truing up of the billets with my carving hatchet. That could have been good enough to move onto the bandsaw, but I put them all through the shave horse. It was nice to have a real smooth surface to draw the templates on.

Speaking of templates, at some point I lost my fancy Spoon Crank template. I’d been given a free set of templates in my designs but felt bad about asking for another freebie. Especially as it was my negligence that put me in this situation. So I ordered another one. The tracking showed that it would be turning up today. But our mail doesn’t get dropped off until the evening. Fortunately, I had my old template (cut out from an old laundry detergent bottle) and was able to use that. It isn’t symmetrical, so I had to use the old trick of tracing around one side, then flipping it over so I could use the same side to complete the spoon outline. Not the worst, but it did get a bit tedious around billet 27.
With all the billets marked up it was time to bandsaw. With the bandsaw running and the shop vac plugged in for dust collection it was bloody loud! Fortunately I had my headphones on and a delectable sampling of 2000s pop hits playing via Spotify, Having Beyonce hoping that I’ll page her right now was some good motivation.
At the bandsaw I had my high tech wood separation of storage solution in place: paper grocery bags. One for the spoon blanks, one for off-cuts big enough to (maybe) use and one for off-cuts destined to heat the house. Before I invested in this patent pending system everything that wasn’t a spoon ended up on the floor. Fantastic trip-hazard material. Especially when an especially large off-cut is cunningly concealed under a thing layer of wood shavings.

Half the spoons bandsawn out, ready for shaping with the drawknife.
Day Two
Worked on roughing out the top and bottom of the spoons. I added a slight crank to them. The round bowl wooden spoon is an absolute kitchen classic. Personally mine get used making sauces in pots. I find that a slight crank is fine as it’s mostly stirring. The crank makes it easier to scoop a little out for tasting. I did a solid two hours before lunch and got more than half of them done. A good morning.

After lunch, things didn’t go a well. The drawknife needed a sharpen. I didn’t realize just how much of a sharpen it needed. Turns out it’s been a while since I’ve taken it the the stones. I’ve been stropping it regularly, so the edge never got particularly blunt. What had happened is I’d created a bit of a convex. Instead of the bevel going straight from the drawknife to the edge, it now curved. So there was essenitally a ridge line running along the length of the bevel that I had to remove. The presence of that lump made is tricky to sharpen on my bench stones. The lump’s real small, but it let the bevel rock back on forth along the stone. If I kept at it I’d just be making the lump worse. Instead I found that using my DMT folding sharpeners worked best. I could brace the drawknife in my lap and sight down along the bevel, visually checking that I was grinding down the top of the lump and not the already low areas in front or behind it. Going real slow was also key.
The back bevel wasn’t completely flat either. It wasn’t as tricky, but it’s really wide, so there’s a lot fo metal to remove to flatten it.
It’s easy to let setbacks like that get you down. But the drawknife was in the state it was in due to lots of little errors on my part. Getting frustrated wasn’t going to flatten any bevels. Sharpening only really takes a long time when you haven’t done it for a while. Lesson learned.

Back on the spoon mule I got the rest of the spoons cranked. I then used my shiny new replacement template to redraw the outline. Sometimes I skip this step and just eyeball it, but the template just arrived and I wanted to use it! Carving in towards this line was the beginning of the much slower work. Partly because I’m needing to be a lot more precise and partly because I’m switching between the drawknife (great for long flat cuts and outside curves) and the sloyd knife (great for tight, inside curves and little fiddly cuts). Got about a dozen ready for hollowing before calling it a day.

It’s been a while since I’ve done a big run of one design like this. I recently did the bent spatulas, but the steam bending meant I was working on batches of 10-14 at a time. Here I’m moving all 40 spoons through the same stage of the process. I got into a really great rhythm adding the crank. I was able to do pretty much the exact same cuts on all the spoons. I was starting to go a little cross eyed towards the end of my morning carving, but the rhythm helped.

Moving onto the finer cuts really highlighted how much small inconsistencies in the earlier stages make a much bigger impact later on. My billets weren’t all evenly thick, some spoons had slightly more crank added than others. These differences are minor, and as the maker, I’m probably the only one who notices. These variations did mean each spoon was more likely to have issues specific to it that needed work. It adds a little more thinking time to each spoon. Keeps life interesting I suppose!
Day Three
I got the rest of the spoons ready to be hollowed then started on a rough hollow. in the bowl. My hollow rough cuts go across the grain, leaving material around the rim to tidy it up using cuts going with the grain. Using the spoon mule meant I could get both hands on the twca cam. The spoon mule is such a great addition to the shop, perfectly gripping spoons while leaving the whole top surface exposed for working on. Much quicker to adjust than sticking the spoon in a vice.

Life commitments and the joys of running your own business meant I had to end the day with 8 spoons still needing a rough hollow. It wasn’t super late, about 7pm, but I was tired, and it’s usually better for me to stop than push on and increase the chances of mistakes happening. It was a good day, but with over 30 spoons ready for finishing touches, it was mildly grating to have so few unfinished.
That feeling does point to an interesting effect with our memories. It’s called the Primacy/Recency Effect. Basically, you’re more likely to remember the things that happen at the start and the end of things. So if I end my day a little disappointed I’m more likely to recall that disappointment than the feelings of success or achievement I might have been feeling in the middle of my day. The Primacy/Recency Effect is a good thing to remember when trying to learn new skills. Learn about the skill, take time to practice it, then spend a little time at the end of the session refreshing how to perform the task.
Day Four and Five
Got those eight spoons rough hollowed! Now onto the finishing cuts for all the spoons. I think I like roughing out the best because of the huge impact you can have in such a short amount of time. In Day One I was able to go from a section of log, a bit of wood that still very much looked like a tree, so forty+ bits of wood most folks could identify as an in-progress spoon. Such dramatic transformations were not in store for me from now on.
The finish is what makes the spoon. Those final touches are what elevates objects from good to great. It’s surprising how tiring doing finishing cuts is. The roughing out is very physical. I have a system in place that replaces decisions with habits. To do the best job I can with the finish I do need a to make a lot of decisions. Each piece of wood is different enough that for the level of finish I want, I have to treat each spoon as an individual. Lots of little choices to make on each spoon. A spoon bowl with wavy grain where a knot used to be, a handle with an area of tear-out, a facet that’s a bit wider than it should be. There are issues that are easy to brush over when roughing out but now have to be dealt with.
I ended Day Four with 15 spoons finished, that left 25 to do on Day 5. An eight hour day is 480 minutes. Divided by 25 spoons gives about 19 minutes per spoon. With that in mind, plus the deadline of wanting them all finished that day, I started to time myself. Rather than set a countdown timer and feel like I was racing to finish, I just started a timer and carved as though I had as much time as I needed. The first spoon took about 16 minutes, the one after that 22, then 18, then 12. Interesting to see that there was a 45% difference between the quickest and slowest spoon. I didn’t time all my spoons, I just wanted to see if I was likely to finish all 25 that day. Those first few spoons averaged at 17 minutes each, so I felt comfortable that I’d be able to finish. I did time a couple more spoons throughout the day, just to check if I was still on track, but I didn’t make a note of the times.
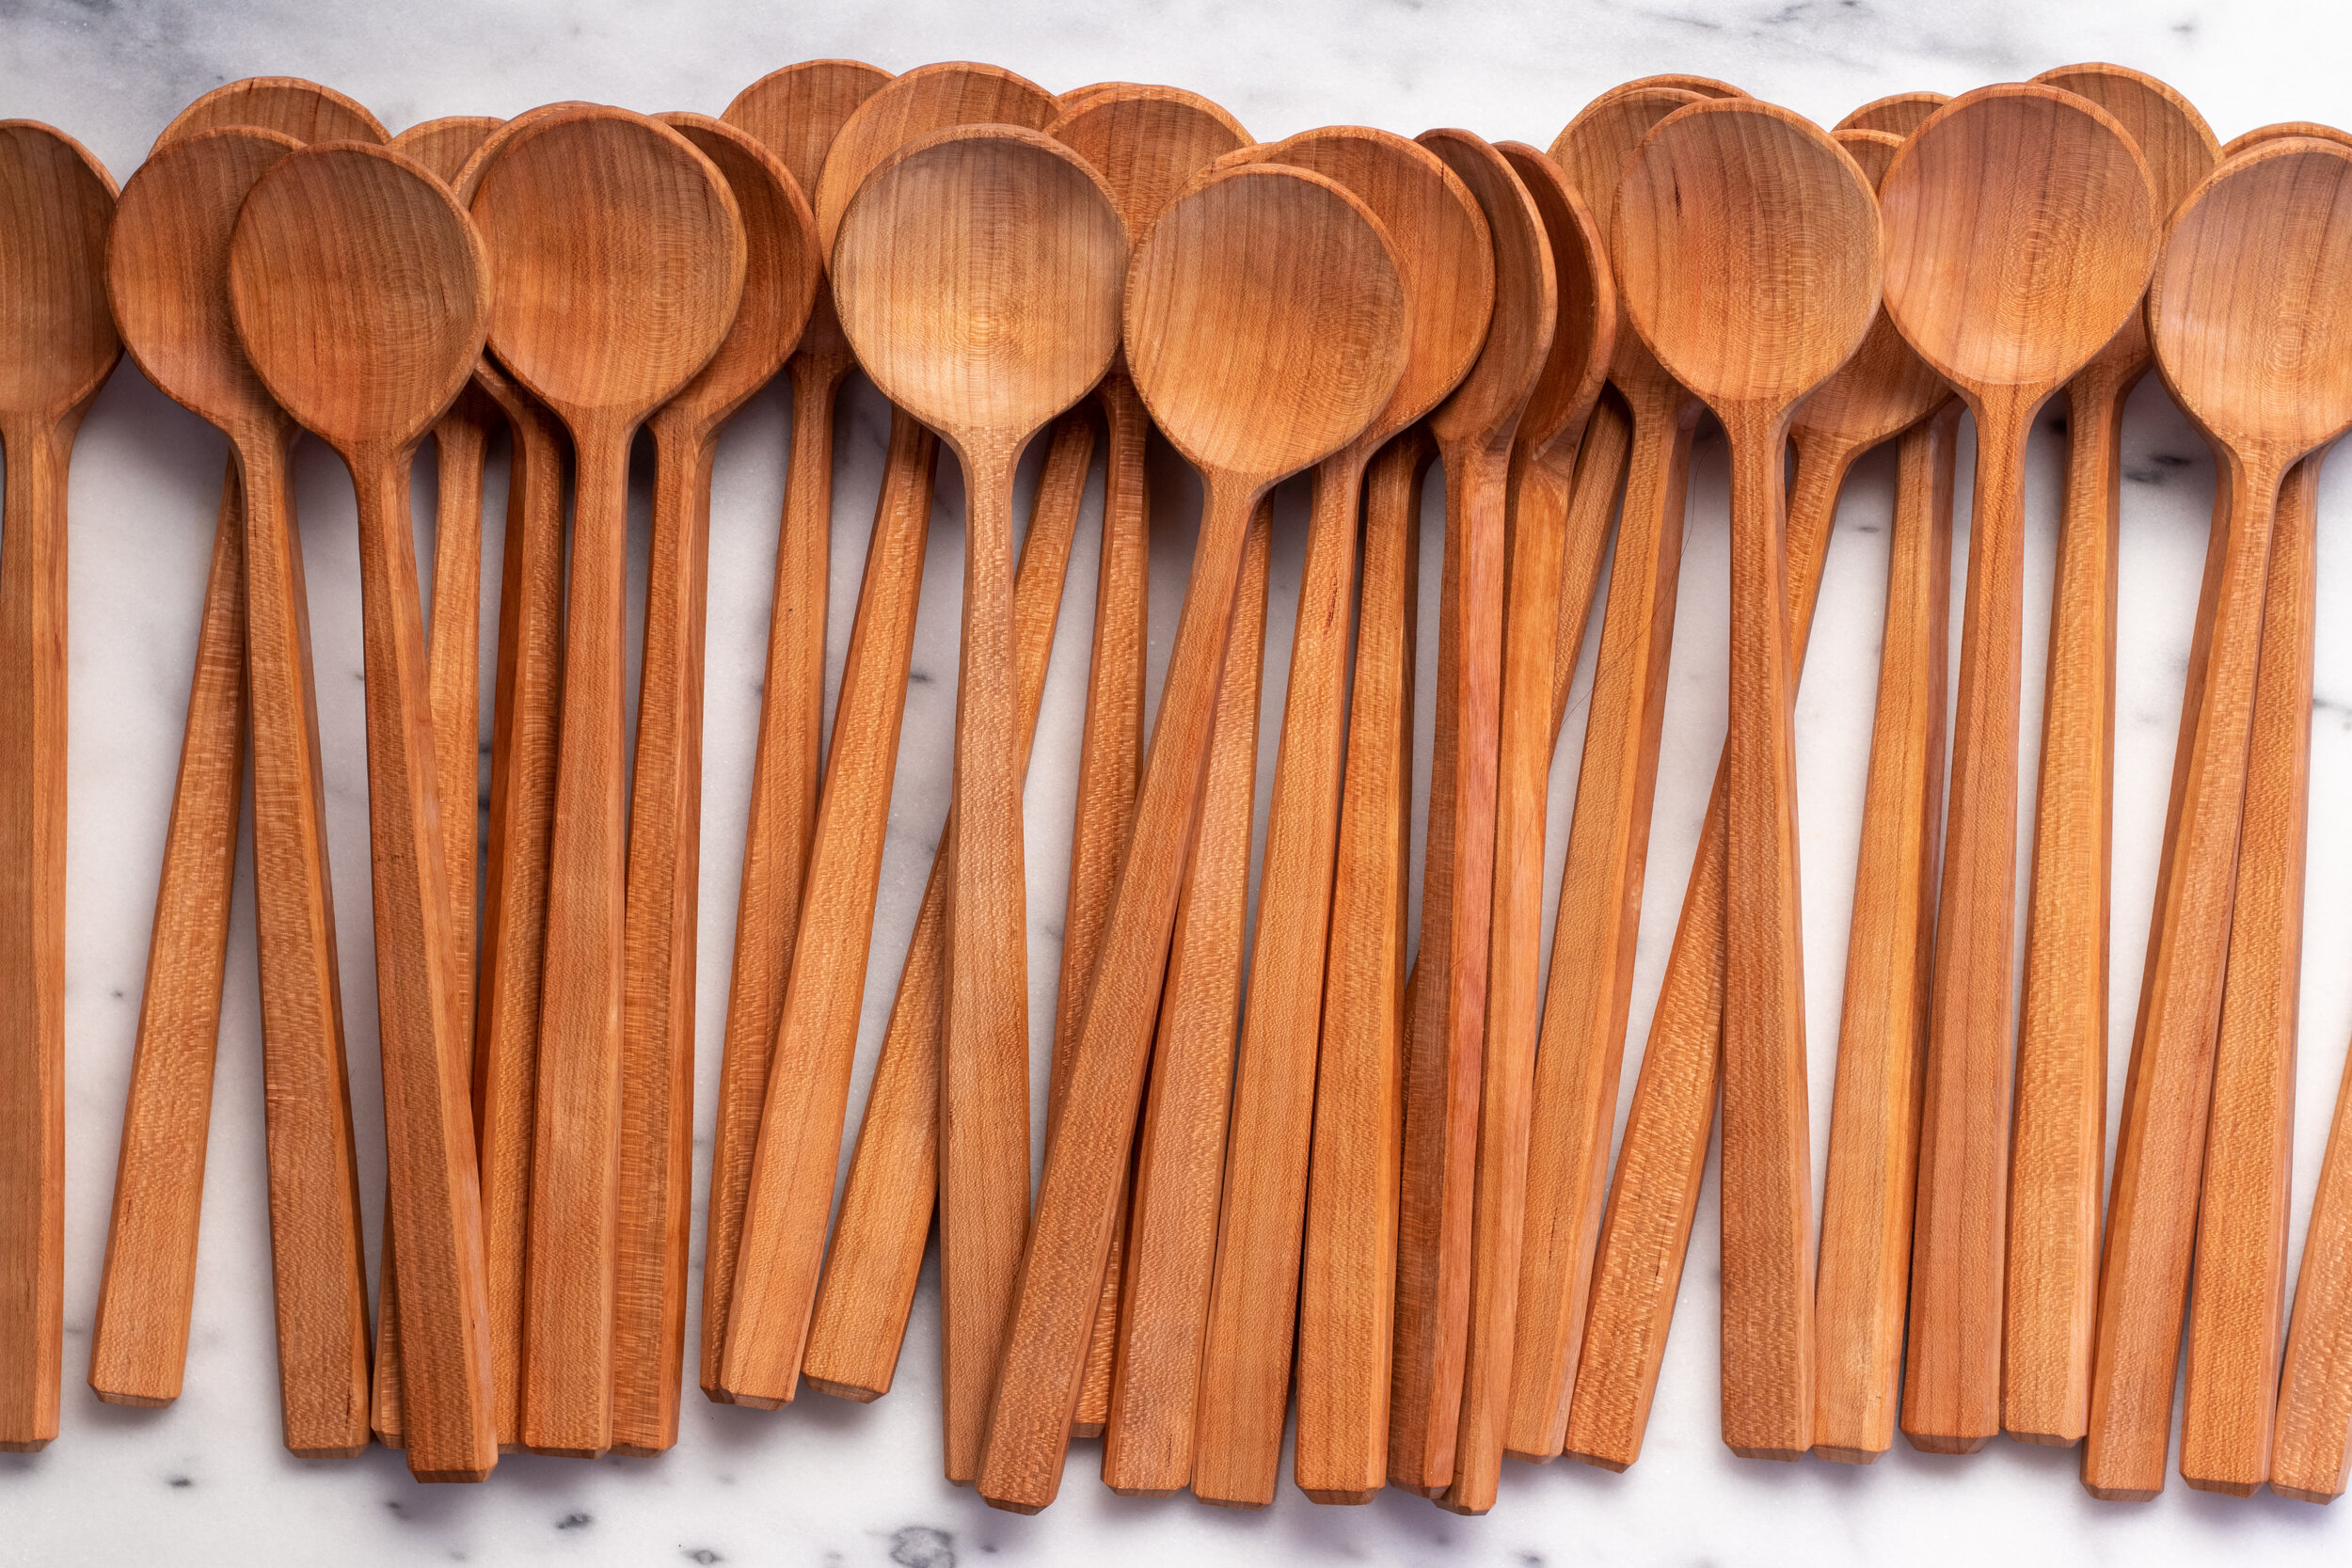
40 Round Spoons finished and added to the shop!
So far I’m enjoying this way of working. Spending a week with my head down in the wood chips lets me really focus on making. I can find the most efficient way to make these designs. It’s also allowing me to spend more time on the business side of the business, something that needs a little more TLC.